


When it comes to minimally or micro-invasive glaucoma surgery (MIGS) it is really all about the angle. In order to effectively perform the MIGS surgery, it is essential to establish the fundamentals of surgical gonioscopy. Below, I will share my top five surgical gonioscopy pearls.
Follow along with the video: 5 Key Steps to Mastering Surgical Gonioscopy in MIGS
1. Tilt the head
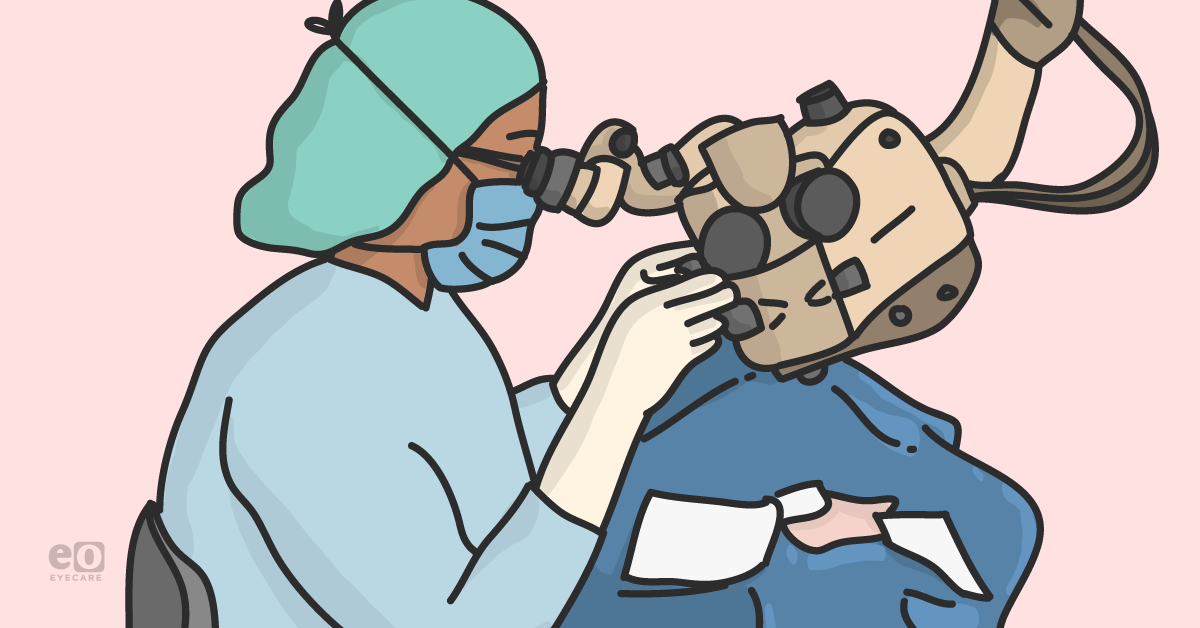
This might appear to be a simple step, but it is very important. In order to obtain a favorable view, one must tilt the head appropriately. Typically for angle surgery, we sit temporally, which makes it good to begin by tilting the patient's head 30 to 45 degrees away from where you will be sitting. (See Fig 1)

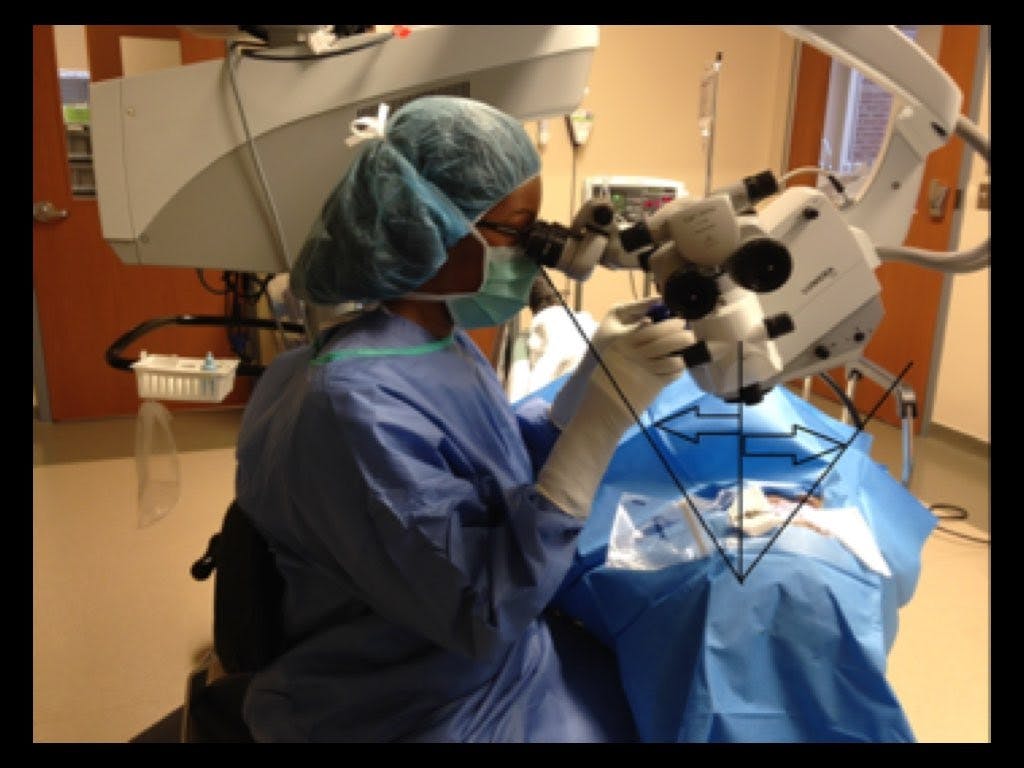
Fig 1. Sitting at a microscope tilted towards the surgeon, and the patient's head turned away from the surgeon.
It is important to position the patient’s head this way before the surgical start for two reasons:
- To ensure that the head can be tilted to that degree
- To communicate with the patient that you are placing their head in the position in which you want them to stay for the duration of the surgery
Sometimes patients may shift and forget the original head placement by the time you are ready to begin that part of the surgery. Therefore, it is best to take the time to discuss this with the patient before you begin the surgery. Communicate to them that once you have positioned their head, this is where you need it to stay in order for you to do this surgery well.
2. Tilt the microscope
Tilting the microscope is another key step. As you tilt the patient’s head away to procure a good view of the angle, you also have to tilt the microscope toward you in order to achieve finer visualization. Again, this should be about a 30 to 45 degree angle. (See Fig 1) What I also have found to be very helpful is to mark the microscope with a black marker once I have established a nice angle for my routine MIGS surgery. .
This allows me to easily find the angle, as I am often going from a position where the microscope is straight for the cataract portion of surgery to tilted for the MIGS part of the surgery. It also allows for quick setup of the surgical microscope when working with different operating room nurses. (See Fig 2)
Another important strategy is to always ensure your microscope focus and starting XY position are centered prior to starting the surgery. MIGS angle surgery is done under high magnification, so completing this step will help to ensure you have enough range to achieve high magnification. Oversight of this step may lead to the inability to increase the magnification for greater visualization of important angle structures during surgery, as you have exhausted the range of ability for any more magnification.
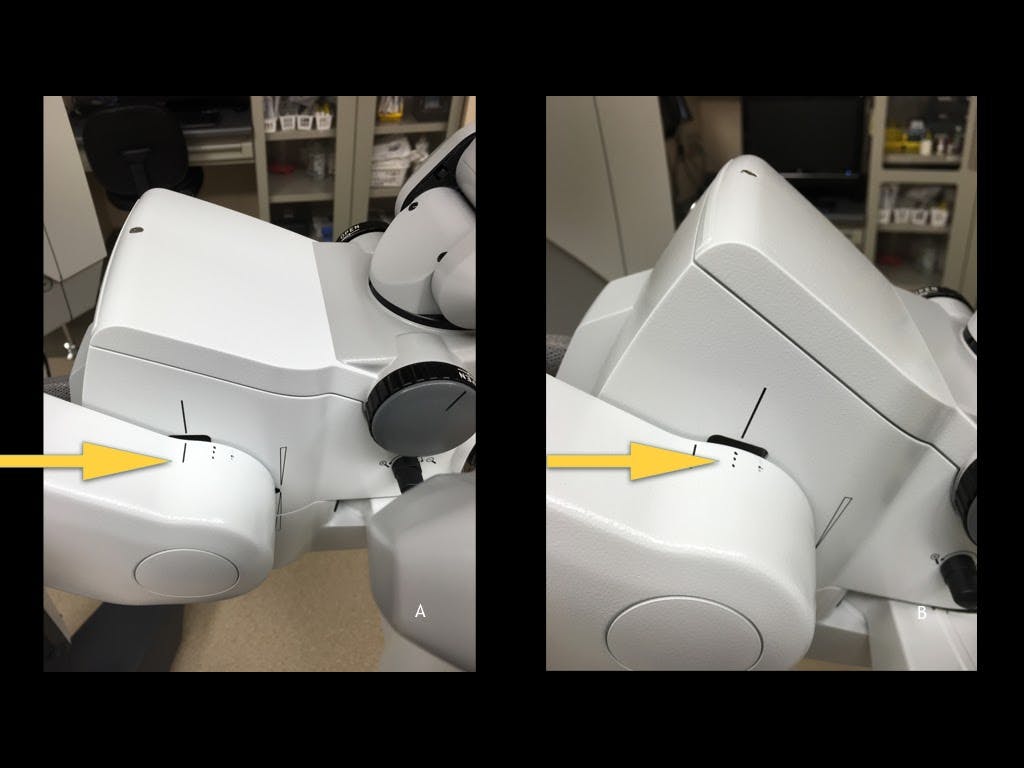
Fig 2. Microscope markings to indicate ideal angle of tilt.
3. How you hold the goniolens
In my practice, I use the Swan-Jacob goniolens and the Hill surgical goniolens, both of which are held in the non-dominant hand. For a novice, this means you are going to be doing something new that may initially feel uncomfortable—so practice makes perfect.
Before you lay your gonioprism on the surface of the cornea, it is paramount to make sure you are using enough viscoelastic on either the surface of the cornea or on the surface of the lens. This will help with visualisation. I like to have my assistant place viscoelastic on the bottom surface of the gonioprism, so it is there when I place the prism on the eye.
Next, as you make contact with your gonioprism, you want to get a very good, clear view. In order to do this you cannot have too heavy of a hand, as applying too much pressure with your goniolens can wrinkle the cornea, causing corneal striae and a poor view. A heavy hand can also result in loss of the viscoelastic that is pressurizing the anterior chamber with egress out of the corneal wound. As a result, pressurization decreases , causing corneal folds and a poor view. Loss of pressure can also result in reflux of heme if the trabecular meshwork has been unroofed or removed in any way.
It is very important to acknowledge the weight of your hand, as both of these scenarios can significantly blur your view and make the surgery more difficult and less efficient. Conversely, applying too little pressure to the corneal surface or too little viscoelastic can lead to bubbles in the viscoelastic or air pockets that can similarly obstruct your view.

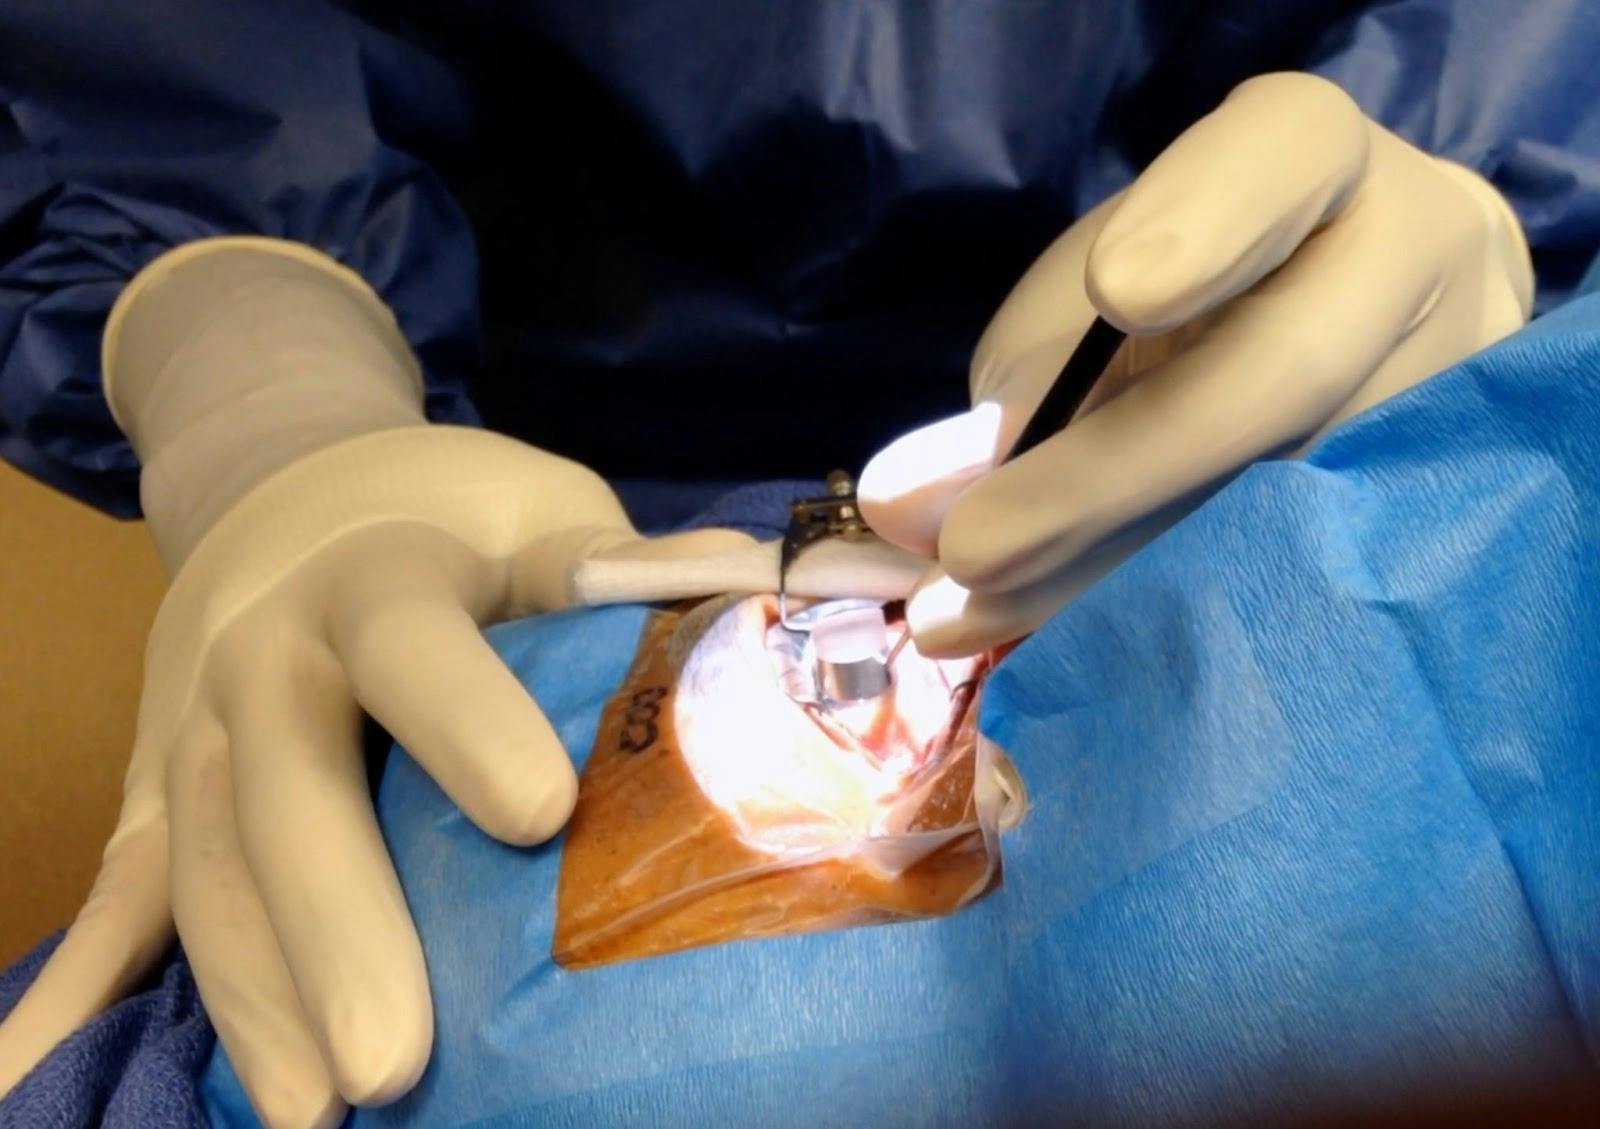
Figure 3. Holding a gonioprism on the corneal surface with a light touch.
4. Know what a good view is
When you are looking at the angle, the key to gonioscopic evaluation is distinguishing an en face view versus a steep-angle view. An en face view is one that is facing forward. It is going to allow you to see all of the angle structures, which will allow you to approach the angle with your device easily.
To obtain this view first make sure your microscope is adequately tilted and that you rotate the patient’s head as much as needed. You can also ask the patient to look in the proper direction, if they are able to stay stable in that position during the procedure. Another tip to attain the en face view during surgery is to use the instrument in your dominant hand and slightly lift your hand up. This movement will rotate the eye away from you to give you more of an on-faced view.
Note that if you are too anterior with a steep-angle view, when attempting this view the structures are going to be somewhat obscured as you try to approach them with your device. This will lead to difficulty making the incisions and performing the procedure.
Additionally, as you use the lens and become more facile with it, you will realize that moving the lens dynamically in different areas and positions will help you achieve a better and wider view, as opposed to staying stagnant in one position and allowing only one view during the entire procedure.

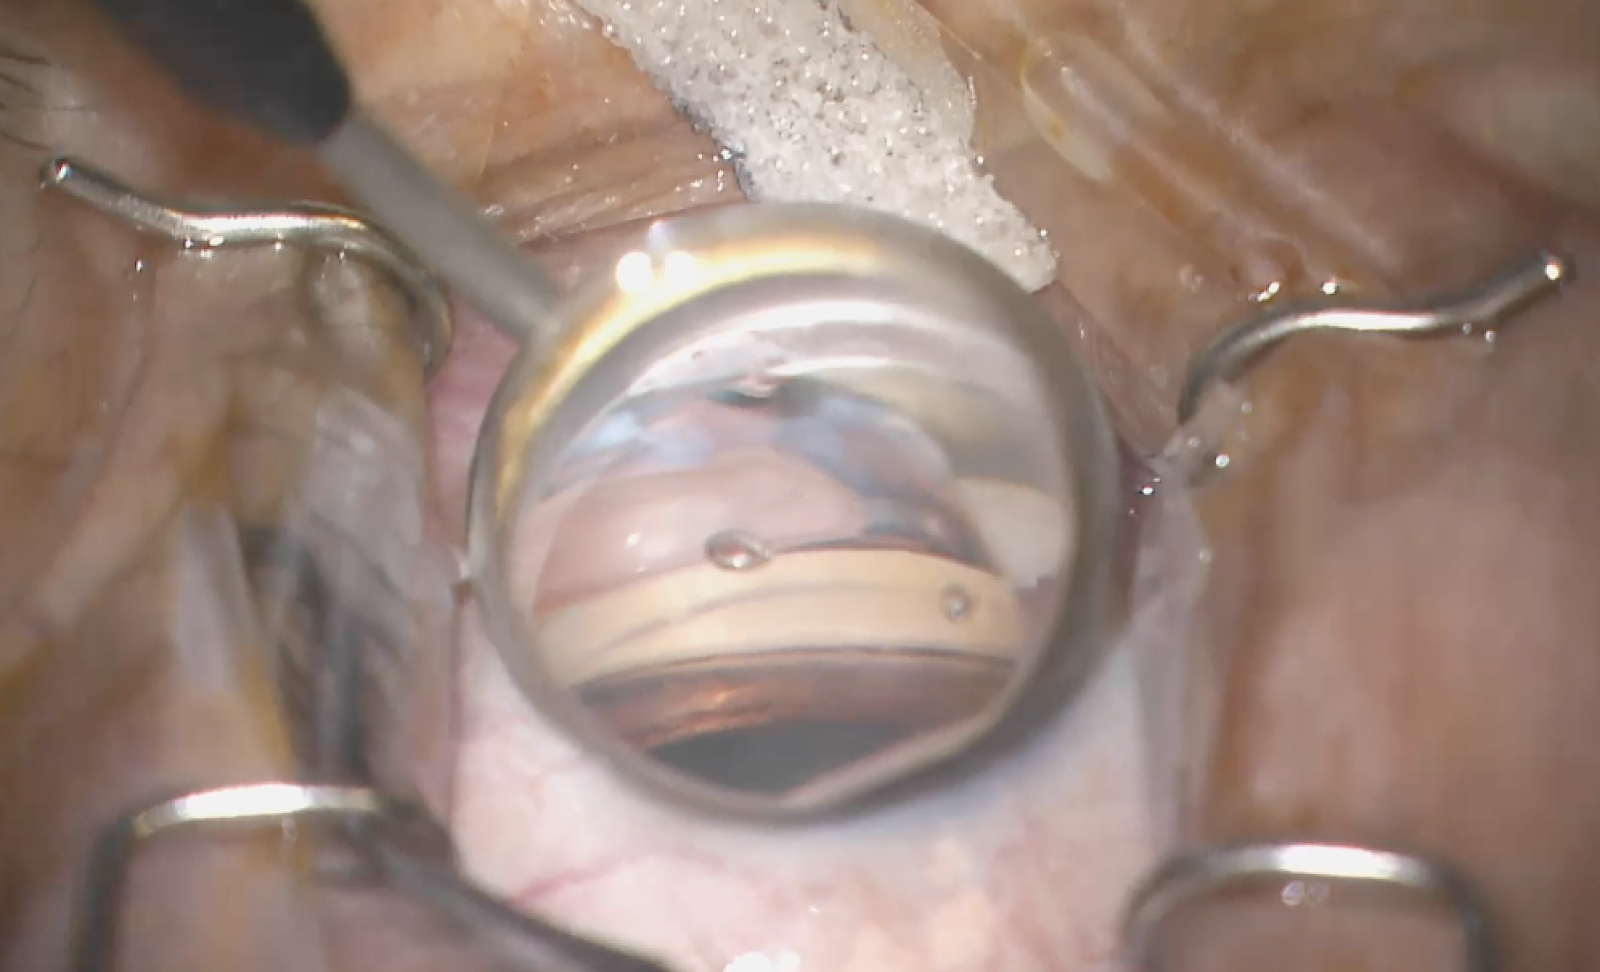
Fig 4. En face view with ability to see all the angle structures clearly.
5. Know anatomical structures
Knowing your anatomical structures is essential. To perform angle surgery you need to know where you are approaching. Typically for angle surgery, whether goniotomy, canaloplasty or stents, you are approaching the trabecular meshwork and addressing the Schlemm's canal behind. A strong understanding of angle anatomy will also help you determine where angle structures are when the anatomy does not look typical.

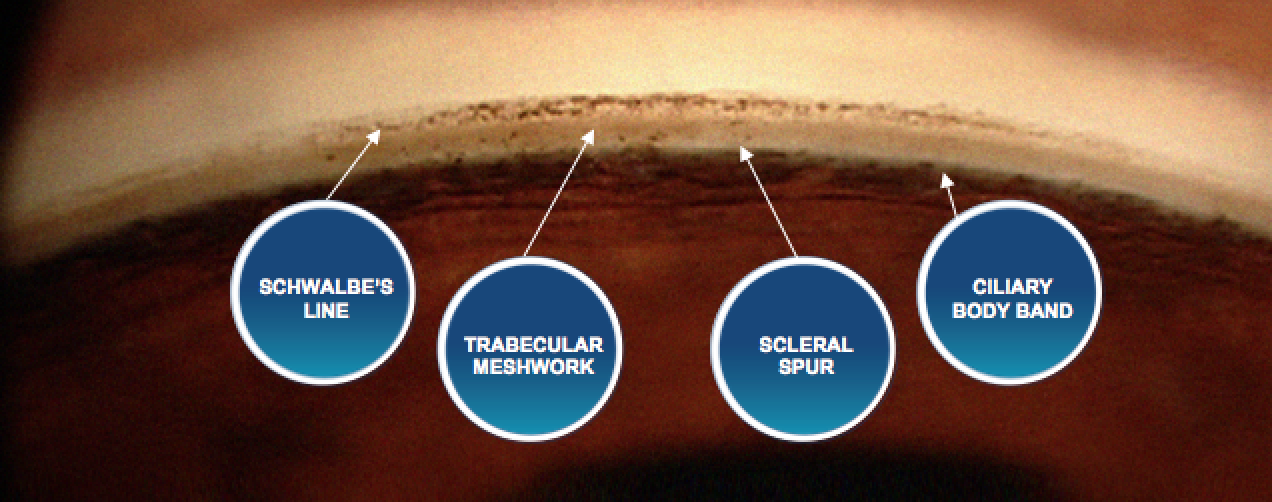
Fig 5. Important angle anatomical structures for MIGS
If you have anatomy that is well pigmented you can easily see the trabecular meshwork, but sometimes the trabecular meshwork may be lightly pigmented, with the ciliary body or ciliary body band being more pigmented. In this scenario, it may be difficult to determine where you are targeting. One way to help highlight a lightly pigmented trabecular meshwork is to either remove viscoelastic or aqueous humor from the AC to lower the pressure in the eye.
After temporarily lowering the pressure and then going back into the eye and repressurising it, you will see with the goniolens that there is refluxed blood in Schlemm's canal. The reflux of heme will highlight the location of the trabecular meshwork and allow you to orient yourself to the patient's anatomy.
Another trick is to follow the pigment. Sometimes, you may not see that much pigment in the area of trabecular meshwork that you want to address. If you look either up or down along the anatomy wall, you may see an area of TM that is more pigmented. This will give you an indication of where the trabecular meshwork is located, and then you can follow it to the area where you want to start.
The trabecular meshwork is like tissue paper, and the incision during a goniotomy should be fairly smooth. When you are in Schlemm's canal performing a canaloplasty, you should be able to follow the catheter’s progress behind the mesh of the trabecular meshwork. These are also visual cues to know that you are in the right area. Sometimes you may feel slight resistance within Schlemm's canal, but you should be able to move your goniolens to look and see that you are tracking in the right place.
I hope these tips help in your journey of mastering MIGS!
Looking for more tips on glaucoma surgery? Check out The Building Blocks of Trabectome Surgery Vol. 1: Patient Selection to learn about improving Trabectome outcomes through a step-by-step patient selection approach, clinical pearls, and more!
Understanding how your front-line colleagues approach glaucoma is more important than ever. Download Eyes On Eyecare's free 2023 Glaucoma Report to see how your peers diagnose, treat, and manage this condition!
